Sales Order Creation
Sales Orders are the core focus of Oracle Order Management module. Sales Order will have all the details of items/goods/services requested by the customer and the due dates.
Sales Order can be entered in multiple ways
- Manual entry (based on a phone call, fax)
- Order Import (through API / Concurrent program)
- Copy from an existing sales order
- Convert from an Quote
- From other CRM modules (Service, Sales)
- From an Blanket Sales Agreement
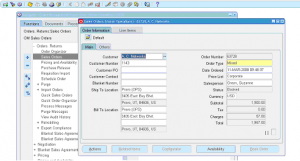
Navigation: Oracle Order Management responsibility -> Orders, Returns -> Sales Orders
This screen opens the sales order header screen.
Enter important fields required to capture sales order header information
- Customer
- Customer PO reference number
- Customer contact name
- Blanket Number if the sales order created from an existing blanket sales agreement.
- Ship to location – this is the address where items are shipped to the customer.
- Bill to Location – this is the address where invoice will sent to customer
- Order Number – Based on setup this can be auto generated or manually entered.
- Order Type (this controls the order life cycle)
- Sales Order date – defaults to current date
- Price List – Determines the price for items/services ordered.
- Sales Person – to capture metrics and calculate sales compensation
- Status – displays the current status, when order is entered the status will be ‘Entered’, as sales order progresses its status is updated.
- Currency – Defaulted from price list
- Order subtotal, tax, charges, total are summarized for viewing.
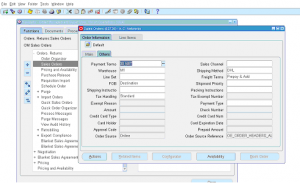
Click on ‘Others’ tab for more data entry
- Payment Terms – determines when the payment is due
- Warehouse – Default warehouse, unless a different warehouse entered at sales order line level, the header level warehouse is used to ship the goods.
- FOB – FOB point
- Shipping instructions – additional information for shipping clerk
- Credit card type, card holder, approval code information for credit card sales orders.
- Sales channel – used for reporting
- Shipping method – Air/ground/sea
- Freight terms – determines how freight charges are handled.
- Shipping priority – to mark urgent, rush, normal, slow orders.
- Packing instructions – additional information for packers
- Payment type – Credit, cash, EFT, Check
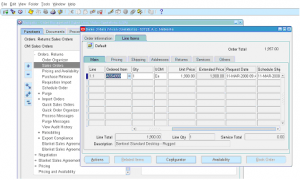
Click on the Lines to enter line level information
- Enter Item, quantity, UOM.
- Unit price will be defaulted from price list.
- Enter requested date and scheduled ship date
- Enter order line type (determines sales order line life cycle)
Click on ‘Pricing’ tab for additional pricing related information – Pricing context, calculate price flag, payment terms, sales agreement and pricing date.
Click on ‘Shipping’ tab to enter additional shipping information – Warehouse, source type (internal/external), request date, scheduled ship date, promise date, planning priority, shipping method, shipment priority, freight terms, line level shipping instructions/packing instructions.
Click on ‘Addresses’ tab to enter ship to customer, ship to location, ship to address, ship to contact, bill to customer, bill to location, bill to address, bill to contact, deliver to location and deliver to contact.
Click on ‘returns’ to enter return order information if this order line is for returned item.
Once all the sales order information is entered it can be scheduled, reserved, or booked to process next steps.


