You are browsing the archive for Business Processes.

8.1 Physical Inventory Setups


  • Form Application: Inventory
  • Form Name: INVADPPI
  • Form Path: /oracle/apps/r12/visr12/apps/apps_st/appl/inv/12.0.0/forms/US/INVADPPI.fmx

Physical Inventory (PI) is a process, every organization that keeps inventory on stock does to verify that actual on-hand quantity matches with system (Oracle apps ERP) on-hand quantity. Typically this is performed every year, but some businesses may decide to do more often. During Physical Inventory all inventory transactions are locked-up, no inventory movements are performed.

In Oracle Apps, Physical Inventory is performed as per the below steps

  • Physical Inventory Setup: System parameters, scope of PI is setup
  • Physical Inventory Snapshot Generation: Inventory on-hand snapshot is taken
  • Physical Inventory Tag Generation: For each on-hand quantity PI Tag is generated and printed. A person who does PI will capture the results in this tag.
  • Physical Inventory Tag Counts: Enter actual on-hand information in the tag and as well update in the system.
  • Approve Physical Inventory Tag Count: Quantity variances that require approval will be approved by authorized person.
  • Adjust Approved Physical Inventory Counts: Approved quantity variances areĀ  posted to Inventory to bring system on-hand match with actual on-hand.

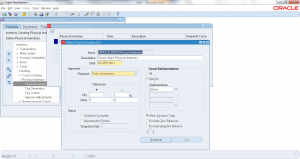
Navigation: Inventory responsibility -> Counting -> Physical Inventory -> Physical Inventories

  • Click on ‘New’ to setup a new Physical Inventory (PI)
  • Enter ‘Name’ of Physical Inventory
  • Enter ‘Description’ of Physical Inventory
  • Enter the ‘Inactive Date’
  • Under ‘Approvals’ select if approval is required outside of tolerances are ‘No’
  • Enter ‘Approval’ tolerances either by quantity or value
  • Under ‘Counts’ section select ‘All sub-inventories’ or ‘specific sub-inventories’
  • Check if Dynamic tags are allowed i.e. tags that are used for any on-hand found that was missing in system snapshot.
  • Check if you would like to ‘Exclude Zero Balances’ (i.e. on-hand quantity is zero)
  • Check if you would like to ‘Exclude Negative Balances’

Save the changes. Physical Inventory parameters setup is complete now.

Physical Inventory Setup

Physical Inventory Setup


7.6 Generate Forecast Automatically


  • Application: Master Scheduling/MRP
  • Program Name: INCFIF

Forecasts are used to forecast future demand (typically sales orders). By using forecasts any business can plan and manufacture goods. Once sales order is received from customer it can be shipped from stock with less turnaround time. There are various forecasting models available to generate the forecasts automatically based on history. Having predictable history information is crucial for identifying right forecast model and generating forecasting. Forecasting can be done manually using people’s expert knowledge of history or automatically generated. In this tutorial you will learn on how to generate forecast automatically.

Navigation: Inventory responsibility -> Planning -> Forecasts -> Generate

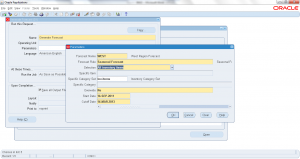
Concurrent program ‘Generate Forecast’ opens up. Enter the parameters

  • Forecast: Select the forecast name. Forecast must be defined first
  • Forecast Rule: Select the Forecast rule. Rules supported by oracle are
    • Focus forecast by day
    • Focus forecast by week
    • Focus forecast by period
    • Monthly
    • Seasonal forecast
  • Selection: Choose – All inventory items, specific item, specific category set or specific category
  • Specific Item: To limit forecast generation for one item enter the item
  • Specific Category set: To limit forecast generation to a category set, enter here
  • Specific Category: To limit forecast generation to a specific category, enter here
  • Overwrite: Choose YES or NO whether to over write the existing forecast or add new forecast
  • Start date: Beginning date of forecast
  • Cutoff Date: Last date of forecast

Click ‘Submit’ to submit the concurrent program. Once concurrent program completed normal, open the forecast you generated to view the results.

Generate Forecast Automatically

Generate Forecast Automatically


7.5 Enter Forecast Manually


  • Form Application: Master Scheduling/MRP
  • Form Name: MRPFFDIF
  • Form Path: /oracle/apps/r12/visr12/apps/apps_st/appl/mrp/12.0.0/forms/US/MRPFFDIF.fmx

Forecast is used to forecast future demand, so that any business can prepare its business plans against it. Accurate forecasting will help in reducing lead times to ship the goods once sales order is received. Forecasts are grouped into forecast sets. Forecasts can be consumed against original sales order once it is received from customer.

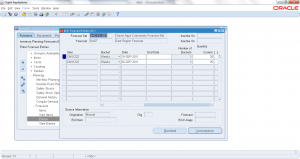
Navigation: Inventory responsibility -> Planning -> Forecasts -> Entries

  • Query the ‘Forecast Set’ / ‘Forecast’ name
  • Enter ‘Item’ to which forecast is entered
  • Select the Bucket as ‘Days/Weeks/Periods’
  • Enter the date on which forecast is entered. If bucket is week or period then date will start date of week or bucket
  • Enter ‘end date’ optionally to inactive the forecast
  • Enter the current ‘Quantity’ i.e. forecast quantity

Save the changes

Enter Forecast Manually

Enter Forecast Manually